Yeah!! It's Friday and I actually made it through this week. We have a busy weekend ahead, with the baptism of little Sophia, and some other family obligations. I can't wait to hold the baby and see her wearing the same christening gown that all of the other 5 children have worn over the past 21 years. I hope you have some fun weekend plans and beautiful weather to boot.
My last project for this week is the Cousins layout below. I used a sketch from Kristine Davidson, The Creative Scrapper's sketchbook that I bought from here and printed out. This is the first one that I used and I followed it without much change. It did use a lot of pattern paper, which is good and bad, depending on how you look at it. I did miss the measurements that I usually get from the Sketch Support sketches, but I figured it out well enough. The ebook itself is nice if you do one page layouts and you don't mind printing it out yourself. Or I guess you can just save it to your computer, but I like to have a hard copy available when I need it. It also gave a variety of samples from different scrappers, which was good. I am sure I will be using it again, soon.
Have a good weekend!
Dani
Friday, April 20, 2012
Wednesday, April 18, 2012
WOYWW 150
After skipping the blogosphere all together last week, this week I am back up and running. Well, maybe not running, since what had me out of commission was my back. Since getting off of the couch, my desk has been busy with one project after another. This morning, it is holding two in progress. One is a scrapbook layout and the other is a gessoed jar waiting for it's coat of yellow spray paint. I am hoping to get both finished today. If the weather permits on the jar. If you are new here and wondering why I am showing you my desk, hop on over to Julia's to find out what this craze is all about and maybe show us your's too!
After playing around with ink splotches and splatters over the weekend, I decided to do something a little more subtle and inked a doily to go with my card. I used Faded Denim Distress ink and a foam pad to color in the surface until the desired results were achieved. I then painted chipboard silhouette pieces and layered them together. The card came together rather quickly which is good because I need quite a few birthday cards these next few weeks.
Happy WOYWW!!
Thanks for visiting-
Dani
After playing around with ink splotches and splatters over the weekend, I decided to do something a little more subtle and inked a doily to go with my card. I used Faded Denim Distress ink and a foam pad to color in the surface until the desired results were achieved. I then painted chipboard silhouette pieces and layered them together. The card came together rather quickly which is good because I need quite a few birthday cards these next few weeks.
| Card #15 |
Thanks for visiting-
Dani
Tuesday, April 17, 2012
More Play
Today's cards were also made while I was playing with ink. The first card was created with the smoosh technique. I simply splatted, such technical terms, the distress stamper quickly to the card stock and let it dry. Once dry, I added my sticker tags, a quick punched border strip, and some stitching.
This next card was stitched around the edge. I then put some distress ink on to a craft sheet, spritzed it with water, then used a fine detail brush to pick up the color. I tapped the brush to let droplets of ink fall on my paper. I pop dotted the Happy sticker for a little dimension. About as simple as it can get.
Thanks for visiting!
Dani
| Card #13 |
| Card #14 |
Dani
Monday, April 16, 2012
Best Buds
Well, I didn't mean to take a blog break last week, but before I knew it, the week was up. I did play around a bit with inks, specifically, Distress Stains. I smooshed, splattered, and stained until my hands were covered in color.
On the layout below, I used the smooshed technique that I read about here. If you have never checked out Ashli's blog, aka soapHOUSEmama, you should. She is so inspirational and her tutorials are amazing! I stamped down my distress stamper and this is what happens. It splatters out across the page. I love it, but be warned, you will have little specks of ink on your work surface, hands, and even clothes. Messy, but oh so fun! I even shook out a few extra droplets on to my page, by gently squeezing the bottle, while giving a good hard shake towards the paper. I love getting dual uses from one product.
Have a good week!
Dani
On the layout below, I used the smooshed technique that I read about here. If you have never checked out Ashli's blog, aka soapHOUSEmama, you should. She is so inspirational and her tutorials are amazing! I stamped down my distress stamper and this is what happens. It splatters out across the page. I love it, but be warned, you will have little specks of ink on your work surface, hands, and even clothes. Messy, but oh so fun! I even shook out a few extra droplets on to my page, by gently squeezing the bottle, while giving a good hard shake towards the paper. I love getting dual uses from one product.
Have a good week!
Dani
Thursday, April 5, 2012
Random Blathering +
Yesterday, when I said it had been raining for days and the weather was only good for scrapping and baking, I meant it. Below is the layout that was on my desk that I finished. Someone asked about the sketch I was using, so here is the link to it.
Once I finished the page, I baked for the rest of the afternoon. I did 4 dozen nutter butters, 8 dozen monster cookies, and 2 dozen banana cupcakes with cream cheese frosting. I only kept a handful. The rest went to my neighbor and to my husband's office.
Someone also asked me about my lighting on the WOYWW post. It is a photography lamp that goes with my photo studio set up. I use it because it is off of my desk, it provides natural light, and it does double duty when I need more lighting for portraits.
Once I finished the page, I baked for the rest of the afternoon. I did 4 dozen nutter butters, 8 dozen monster cookies, and 2 dozen banana cupcakes with cream cheese frosting. I only kept a handful. The rest went to my neighbor and to my husband's office.
Someone also asked me about my lighting on the WOYWW post. It is a photography lamp that goes with my photo studio set up. I use it because it is off of my desk, it provides natural light, and it does double duty when I need more lighting for portraits.
Well, there you have it. Hopes this answers your questions.
Have a blessed Easter! I will be back next week.
Dani
Wednesday, April 4, 2012
WOYWW 148
I really didn't think that I would have a chance to play along today, but here I am. We have been having some pretty bad weather here the past two days, so what better thing to do then stay in and scrap. And bake.
On my desk this morning is a layout that I have just started; nothing is glued down yet. I am working with a sketch that I have used before from Allison Davis. I like that it lends itself to 4 nice sized photos.
Okay, I know that was quick and some of you might be wondering why I showed you a picture of my desk. Hop on over to Stamping Ground to find out what it is all about.
Happy Humpday!
Dani
On my desk this morning is a layout that I have just started; nothing is glued down yet. I am working with a sketch that I have used before from Allison Davis. I like that it lends itself to 4 nice sized photos.
Okay, I know that was quick and some of you might be wondering why I showed you a picture of my desk. Hop on over to Stamping Ground to find out what it is all about.
Happy Humpday!
Dani
Tuesday, April 3, 2012
Room Makeover
I want to thank you all so much for your very kind words on yesterday's blog post. I know leaving her to do it on her own was best. She is my only baby and sometimes it is hard to let go.
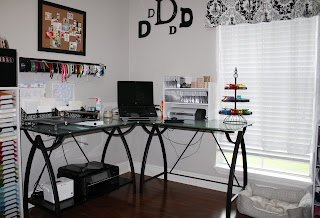
Today, I wanted to share the re-do of my room. I finished it this past weekend so here is a (very) quick tour of each space and what I use it for.
First up is yellow desk, at 4 ft. long, which I love. I do most of my scrapping and card making on this desk. The long drawer up front holds all of my hand tools, glues, and pens. It also houses my twine and washi tape collections. Next to it is my best craft organizer. It holds all of my cardstock, embellishments, and such. On top, is my ink pad holder and my pattern paper kits and collections.
This next corner is where I do all of my computer work, photo editing,printing, and cutting, and where I keep my Silhouette ready for use. I just need to get in the habit of using it more than I do. Behind the trimmer, I have two desk organizers filled with blank cards and their matching envelopes ready to go. When I run low, I sit and cut a batch in different sizes. This assures that I always have the right size envelope for the card I have made. Too many times I have finished a card only to realize that I do not have the correct size envelope to mail it. This eliminates that problem.
On the far left, is my tiny die cut and embossing center. It also holds some fabric for my sewing. In the center is my sewing closet. My dh removed the doors and installed a table height shelf for my machine. I also store punches and other mixed media things in this closet. I have two three drawer bins under the table for storing things such as extra adhesives, packing supplies, and items meant for altering. Stella, my dress form, holds my sewing scissors, tape measure, and a few other odds and ends on her. She is named after my great-grandmother who was the most creative person I knew.
To the far right, is my cubby stand. Actually, it is two stacked together. The bins hold things such as containers, tins, yarn, jars, and such. The boxes keep my inks, stamp making supplies, brayers, etc. out of sight, but because everything is labeled I can find what I need with just a quick glance.
Well, there you have it. Any questions, feel free to ask.
Thanks for visiting!
Dani
Today, I wanted to share the re-do of my room. I finished it this past weekend so here is a (very) quick tour of each space and what I use it for.
First up is yellow desk, at 4 ft. long, which I love. I do most of my scrapping and card making on this desk. The long drawer up front holds all of my hand tools, glues, and pens. It also houses my twine and washi tape collections. Next to it is my best craft organizer. It holds all of my cardstock, embellishments, and such. On top, is my ink pad holder and my pattern paper kits and collections.
This next corner is where I do all of my computer work, photo editing,printing, and cutting, and where I keep my Silhouette ready for use. I just need to get in the habit of using it more than I do. Behind the trimmer, I have two desk organizers filled with blank cards and their matching envelopes ready to go. When I run low, I sit and cut a batch in different sizes. This assures that I always have the right size envelope for the card I have made. Too many times I have finished a card only to realize that I do not have the correct size envelope to mail it. This eliminates that problem.
On the far left, is my tiny die cut and embossing center. It also holds some fabric for my sewing. In the center is my sewing closet. My dh removed the doors and installed a table height shelf for my machine. I also store punches and other mixed media things in this closet. I have two three drawer bins under the table for storing things such as extra adhesives, packing supplies, and items meant for altering. Stella, my dress form, holds my sewing scissors, tape measure, and a few other odds and ends on her. She is named after my great-grandmother who was the most creative person I knew.
To the far right, is my cubby stand. Actually, it is two stacked together. The bins hold things such as containers, tins, yarn, jars, and such. The boxes keep my inks, stamp making supplies, brayers, etc. out of sight, but because everything is labeled I can find what I need with just a quick glance.
Well, there you have it. Any questions, feel free to ask.
Thanks for visiting!
Dani
Subscribe to:
Posts (Atom)
